How to Use TuneMobie iTunes Converter Toolkit?
TuneMobie iTunes Converter Toolkit is a bundle of TuneMobie Apple Music Converter and TuneMobie M4V Converter Plus. TuneMobie Apple Music Converter can convert Apple Music, M4B/AA/AAX audiobooks, M4P, etc. to MP3, M4A, WAV, etc. playable on iPod Nano, iPod Shuffle, PSP, Walkman and any MP3 players. TuneMobie M4V Converter Plus can convert iTunes purchases and rentals including movies, TV shows and music videos to plain MP4 playable on all mainstream mobile phones, tablets and game consoles.
Step 1: Unzip iTunes Converter Toolkit
After downloading the toolkit, you will get a zip file. Use Winzip, WinRar or any decompression software to unzip and you will get two installers for TuneMobie Apple Music Converter and TuneMobie M4V Converter Plus respectively.
Please install Apple Music Converter and M4V Converter Plus respectively. The programs will perform as separate programs.
Step 2: Use Apple Music Converter
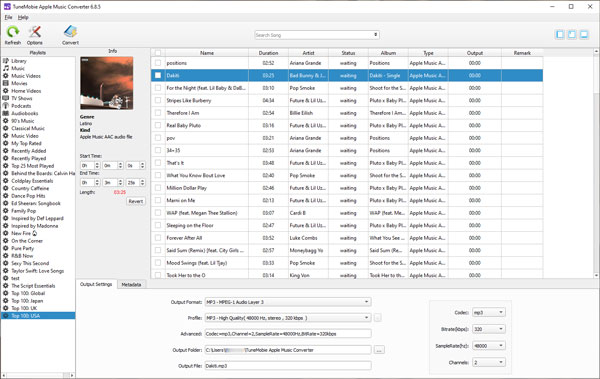
1. Launch Apple Music Converter and iTunes will be automatically launched as well. All playlists will be displayed in the left panel.
2. Choose a playlist and select Apple Music tracks or audiobooks you want to convert. Tick the checkbox in the information bar to select all tracks in the playlist.
3. Choose an output format in profile list. MP3 is default output format. If necessary, you can change output format and change audio quality and other parameters.
4. If necessary, click options to adjust conversion speed, it could be from 1X to 16X. Also, you can set rules for renaming and organizing all output songs by ID tags and characters.
5. Now you can click Convert button to start converting Apple Music and audiobooks to specific audio format. And click "Open Output File" button to open output folder. Then you can copy or sync to your device to enjoy.

Note: This is only a summary of user guide, you can also click to view detailed Apple Music Converter user guide.
Step 3: Use M4V Converter Plus
1. Launch M4V Converter Plus and iTunes will be automatically launched as well.
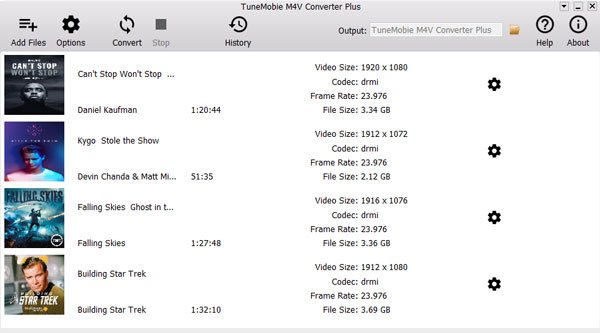
2. Click "Add Files" to load iTunes purchased or rental videos including movies, TV shows and music videos. Choose any M4V videos you want to convert. Then click Add button. Or click Add All button to add all videos in the playlist.
3. By default, M4V Converter Plus will preserve all original Dolby 5.1, closed captioning, audio descriptions, multilingual subtitles and audio tracks. However, you can uncheck any tracks if you don't want to keep.
4. If necessary, click Options button to change output folder.
5. Now you can click Convert button to start converting iTunes M4V videos to plain MP4. After conversion, you can click History button to check the output folder or delete the conversion record.

Note: This is only a summary of user guide, you can also click to view detailed M4V Converter Plus user guide.


