- Part 1: The Breif Introduction of HomePod
- Part 2: How to Play Apple Music Songs with HomePod on Windows, PC, iPhone/iPad
- Part 3: TuneMobie Apple Music Converter: Keep Playing Your Favorite Apple Music Songs
- Part 4: How to Convert Apple Music Songs to MP3/M4A and Keep Playing with Homepod
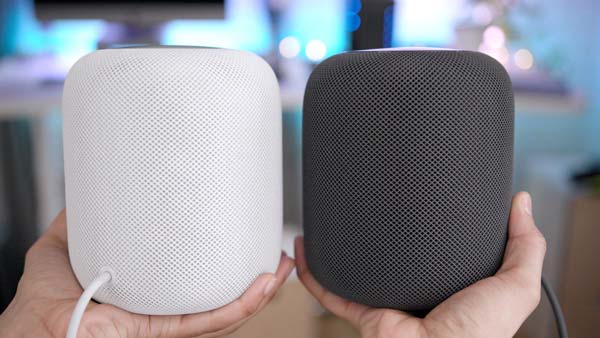
The Breif Introduction of HomePod
HomePod is a smart speaker launched by Apple in 2017. HomePod has built-in Siri, which can be used in conjunction with Apple Music. It supports spatial perception technology to automatically analyze the sound quality, and adjust the sound effect according to the position of the speaker. In fact, Apple Music is the only music service supported by HomePod, and Siri voice operations can only support Apple Music.
When the user has multiple homePods at home, they can place the homePods in different rooms and achieve the effect of mutual communication and cooperation through air play, such as asking Siri to play jazz in the living room, play animation music in the children's room, or play the same homePod in all rooms. song.
In addition, after the user added smart home accessories to the Home App, the user can control the smart home accessories through the homePod, such as "Hey Siri, turn on the light in the kitchen", "Hey Siri, lower the temperature", etc.
HomePod actually has a built-in Bluetooth 5.0 low-power module. On the one hand, it realizes the connection and pairing of iPhones, and on the other hand, it is used for collaborative communication between multiple HomePods.
However, HomePod is not a Bluetooth speaker that can be connected at will. Homepod mini does not support connecting to devices other than Apple. Android phones and Windows computers cannot be connected to homepod mini via Bluetooth.
But this kind of closure has created an extremely pleasant connection experience: not long after the power is connected, the graceful animation of HomePod will pop up on the iPhone, no need to search for Wi-Fi, no need to enter a password, and the pairing is completed by clicking a few buttons.
How to Play Apple Music Songs with HomePod on Windows, PC, iPhone/iPad
You can play Apple Music and plain songs through Homepod speakers on Windows, Mac, iPhone/iPad, but unfortunately, HomePod, as a part of Apple's closed ecosystem, does not support Android devices. If you want to use HomePod to play Apple Music on your Android device, you can try some third-party apps that support AirPlay on the Google Play Store.
1. How to Play Apple Music Songs with HomePod on Windows
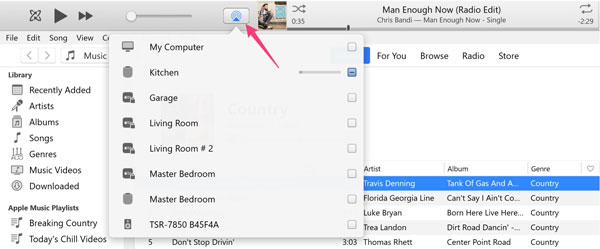
Step 1: Make sure you have installed iTunes and latest version is recommended. Launch iTunes and sign in iTunes with your Apple ID which is associated with your Apple Music subscription.
Step 2: Play your favorite Apple Music songs or other songs from iTunes Store or external sources.
Step 3: Click the AirPlay button at the top of the iTunes window, then select the checkbox next to HomePod. Whatever song you were playing in iTunes on your computer now plays on HomePod too.
2. How to Play Apple Music Songs with Homepod on Mac
Step 1: Launch Music app and sign in your Apple ID which is associated with your Apple Music subscription.
Step 2: Play any songs including Apple Music songs in your music library.
Step 3: Click the AirPlay button at the right top of the Music aa, then select the checkbox next to HomePod. NOw the song which were playing in Music app on your Mac plays on HomePod too.

2. How to Play Apple Music Songs with Homepod on iPhone/iPad
Step 1: On iPhone, go to Settings > Bluetooth, turn on Bluetooth. Please note that Bluetooth must be turned on to hand off audio.
Step 2: On iPhone, go to Settings > General > AirPlay & Handoff, then make sure "Transfer to HomePod" is turned on.
Step 3: Hold your iPhone near the top of HomePod.
Step 4: Play any songs including Apple Music songs in your Music app, and the song will be played on HomePod.
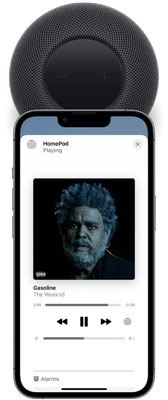
On iPhone or iPad, you can also play Apple Music songs on HomePod using Control Center. Swipe down from the top-right edge if you are using an iPhone with Face ID or an iPad, or swipe up from the bottom to open Control Center, then tap the audio card, tap AirPlay button and select one or more HomePod speakers.
TuneMobie Apple Music Converter: Keep Playing Your Favorite Apple Music Songs
Though Apple Music is one of the most popular streaming music services on iPhone/iPad, still there are many other users who may switch to other services instead because of various reasons. Some of them may want to keep playing their favorite Apple Music songs on HomePod after unsubscribing Apple Music. With TuneMobie Apple Music Converter, this goal is easy to achieve.
Check the wonderful features of TuneMobie Apple Music Converter below.
- Convert Apple Music songs to MP3, M4A, WAV or AIFF which can be played on HomePod
- Convert Apple Music in batch with a built-in web player without using iTunes or Music app
- Keep music information including title, album, artist, track number and artwork in output music files
- Rename output files in bulk by title, album, artist, track number, hyphen, space, etc.
- Sort output files into folders by album, artist, artist/album or album/artist.
- Choose MP3/M4A bitrate to meet your different audio quality requirement
- Perform 20X faster Apple Music conversion speed on both Windows and macOS
- Fully compatible with latest Windows and macOS (Intel & Apple silicon)
The free trial version of TuneMobie Apple Music Converter allows you to convert 3 minutes of each song and convert 3 files at a time. If you want to keep playing your favorite Apple Music songs after you stop using Apple Music, please do not hesitate to download TuneMobie Apple Music Converter and give it a shot.
Convert Apple Music Songs to MP3/M4A and Keep Playing with Homepod
TuneMobie Apple Music Converter provides an easy-to-use interface, 20X faster conversion speed, diverse output formats, flexible output options and high-quality output files. Check the user guide below to learn how to keep playing Apple Music songs on HomePod after your Apple Music subscription expires.
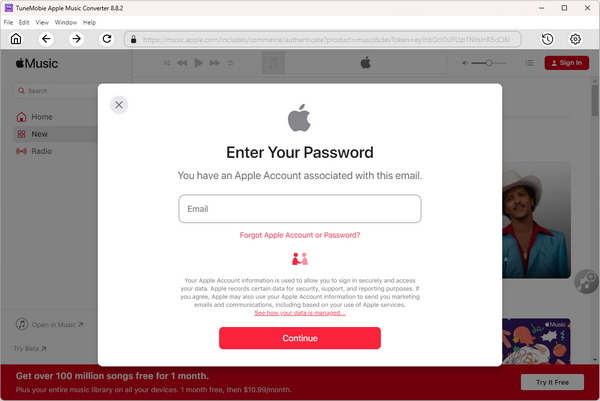
Step 1: Launch TuneMobie Apple Music Converter and Sign in
Launch TuneMobie Apple Music Converter and you will see a built-in Apple Music web player. Click "Sign In" button at the upper right to sign in the Apple Music web player. You don't need to enter Apple ID and password next time if you don't sign out.
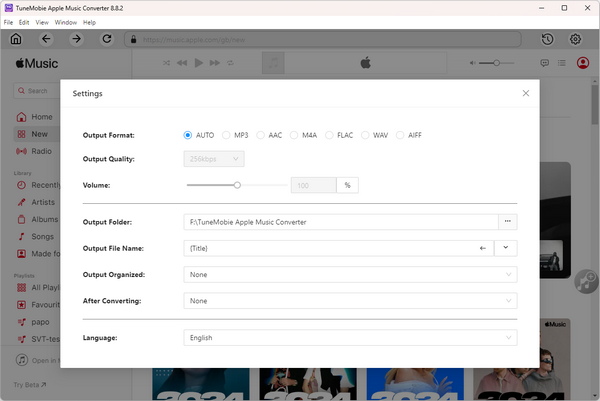
Step 2: Choose An Output Format
The default output format is AUTO option, which is 256kbps M4A. As it can be played on HomePod, you don't need to change output format. However, if necessary, you can click Settings icon to open Settings dialog, then change output format to MP3, M4A, WAV or AIFF. Please note that FLAC can't be played on HomePod. There are also some more useful options which you can adjust depending on your need.
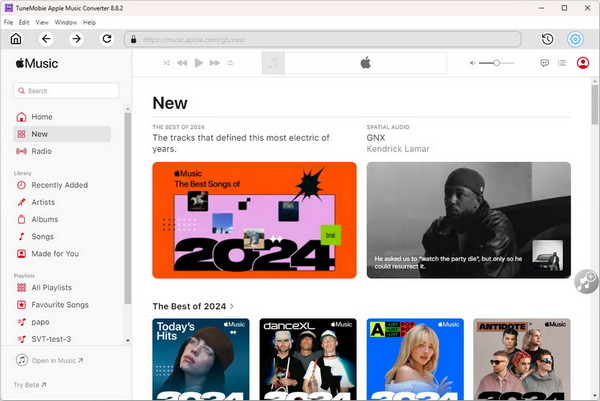
Step 3: Open Apple Music Album/Playlist
Go back to the built-in Apple Music web player and browse your favorite album or playlist, then open the detailed page of an album or a playlist and song list will be displayed.
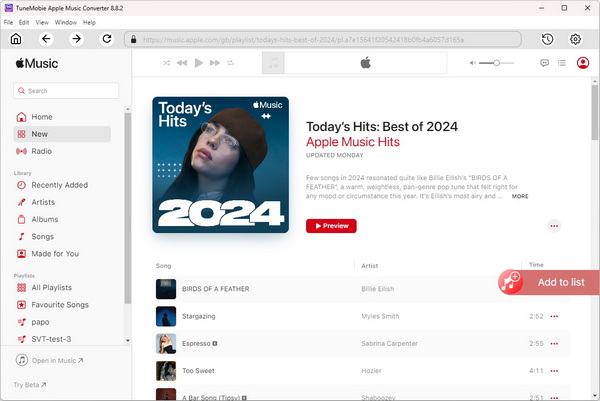
Step 4: Add Album/Playlist to Conversion List
You can easily find a button in the center right, move your mouse to the button and it will be changed to "Add to list" button. Click "Add to list" button to add all the songs in the album/playlist to conversion list.
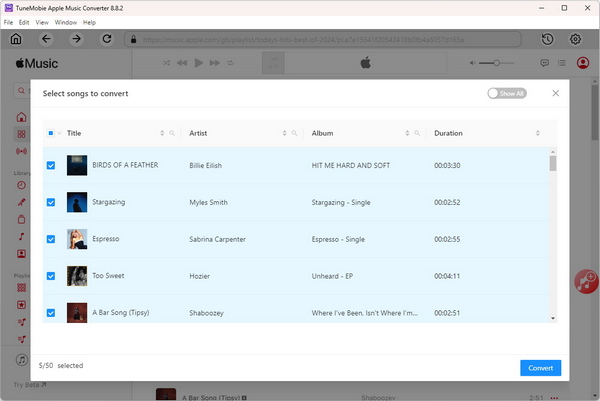
Step 5: Choose the Songs
All the songs will be checked by default. If you don't want to convert some of the songs, you can simply uncheck them. You can also uncheck the top checkbox in information bar to uncheck all the songs, then check the songs you need.
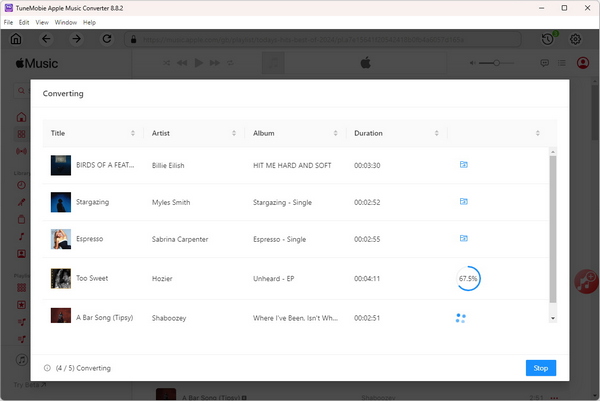
Step 6: Start Apple Music Conversion
Now simply click the Convert button to start converting Apple Music songs to MP3, M4A or WAV. With 20X faster conversion speed, the conversion will be done in a short time.
Step 7: Keep Playing Converted Apple Music Songs on HomePod
If you are using Windows, please launch iTunes, click menu "File" > "Add File to library" and add the output songs to iTunes music library first. If you are using macOS, please launch Music app, click menu "File" > "Import" to add the songs. You can use iCloud Music Library feature to sync the songs to your iPhone or iPad, or manually transfer the songs to your iPhone/iPad with iTunes on Windows or Finder on macOS.
Now you can keep playing your favorite Apple Music songs with HomePod on Windows, Mac, iPhone and iPad.
Bottom line
Are you using one or multiple HomePods? If yes, probably you have known how to use HomePod to play Apple Music songs on Windows, Mac, iPhone or iPad. If not, we also hope that our article is helpful. If you're considering switching music services and want to keep listening to the Apple Music songs you spent time picking after canceling your subscription, then TuneMobie Apple Music Converter will be a good choice.